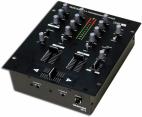
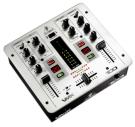
There are hundreds of different mixer desks, from cheap ones to the most professional versions. However, for radio streaming, a normal DJ mixer will suite all your needs. The biggest difference between DJ mixers is in the number of channel available, each channel corresponding to a different audio source. The minimal requirement is a 2 channel mixer with microphone input.
If you want, you can set up an external mixer between your audio sources (except for digital audio directly coming from your computer) and the soundcard which is going to capture the audio and send it to the streaming source. Depending on the characteristics of the mixer you're using, you could connect turntables, digital audio sources (such as cd players, minidiscs, laptops etc.), microphones or even play live instruments to it, mix all those audio sources together and then send the mixed audio to a streaming server for live streaming!
If you are going to use such a setup, though, you should take some time to familiarize with the mixer you're going to use. We will now try to give you a general briefing of how a mixer works. Keep in mind, though, that this tutorial is not intended to be a professional audio mixing howto; if you'd like to study that subject more deeply, please refer to other documentation sources, starting from your mixer's user manual.
A mixer is, just like its name suggests, a device designed to mix several audio signals into one single audio signal. Every mixer has at least two input channels, and each one of them can be connected to an audio source. Mixers also have one or more output channels; this is where the mixed signal comes out from. One of the output channels is usually called the master output; every mixer has at least this output channel. Many mixers also have alternative output channels, such as "Rec Output", "Booth", or "Master 2". These can either be just clones of the Master output, or fully customizable output channels. Another output channel that virtually every mixer has is the "Headphones" output channels; this is usually used to connect a pair of headphones to the mixer.
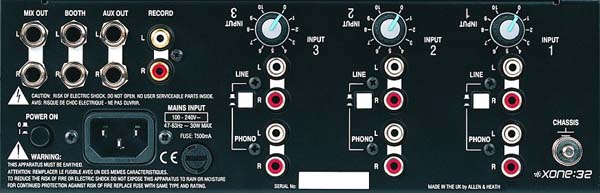
If you look to the back of a mixer, you will see a set of input connectors, one for each input channel. On most mixers, each couple of connectors will be labeled with a prefix like "Line", "Phono" or "Mic", followed by a progressive number. Thus, a typical small 2-channel DJ Mixer will have four couples of input connectors: Line 1, Phono 1, Line 2 and Phono 2. The first two of them are mutually exclusive input connectors for input channel 1; the last two are mutually exclusive input connectors for input channel 2.
The prefix on the input connectors is a cue to what type of input channel these connectors belong to. Phono channels should be used when connecting an analog sound source to the mixer, such as turntables or tape players. Line channels should be used when connecting digital sound sources, such as CD players, laptops, digital instruments. On the mixer you will probably find a selector for each channel, which enables you to switch between Phono and Line mode for that channel. Microphones used for talkover usually have an input channel of their own, with a different kind of connector.
Mixer controls are knobs, switches and sliders located on top of the mixer, and they vary greatly with every model. Most mixers controls will be divided in "columns", each corresponding to one input channel. Each column will probably have a volume slider (even though in some mixers this fader is replaced by a knob) and two or three equalizer knobs (normally, it's one for low, one for medium and one for high frequencies). Each input channel will normally have a "Gain" knob (usually located on top of the whole controls column) which is used to give extra power to weak input signals. Most mixers then have one or two columns dedicated to output channel: one of them will be for the master output, while extra outputs could just have a knob controlling their output level. DJ mixers often have a switch on top of some of their input channels controls, allowing to select between "Phono" and "Line" input connectors for that input channel.
The "master volume" slider or knob controls the volume level of the Master output channel, while the "Headphones Level" or "Cue Level" knob controls the volume of the headphones output channel. Most mixers also used coloured LEDs to display the signal intensity of both input and output channels. Incoming audio signals are measured and their intensity can be tweaked using the Gain knob or the volume slider for each input channel; the intensity of output channels can be controlled by using the respective volume slider or knob (Master volume, Booth volume, Rec volume, and so on).
As a general rule, you should always check that neither input nor output channels display a signal intensity in the "red" section of their LEDs. When a signal is so strong that the LEDs representing it go into the red section, this is very likely to cause signal distortion and to alter the overall sound quality. If an input signal is too strong, use the gain knob to lower its intensity. If that's still not enough, lower its volume slider. If an output signal is too strong, use its volume control to lower down the signal intensity. By doing that, you will ensure that no distortion is accidentally applied by the mixer to your sound stream.
Another interesting feature of most mixers is the ability to send the signal received by one or more input channels to the headphones output channel, leaving out all the other input channels. This is usually accomplished by a button or switch called "Cue" which should be present among the controls for each input channel.
Before you start streaming, you will have to make all the proper audio connections from the audio sources to the mixer, and from the mixer to the soundcard that you will be using for capture. This can be tricky sometimes, because of the different audio connector standards used on the market.
Before connecting any instrument to your mixer, either turn your mixer off or lower the master output volume to zero. This will avoid sending noise signals to the output channels. Take a minute to do the following preliminary tasks:
- Take note of how many input channels your mixer has, and if they are Line, Phono or Microphone input channels
- Think about how many digital and analogue sound sources you are going to connect to your mixer
- If needed, write down a scheme of which sound source will be connected to which input channel
Once you have a clear idea of the overall input connection scheme, you can start connecting digital audio sources to the Line input channels, analogue audio sources to the Phonos input channels, and microphones to the Microphone input channels.When all the needed audio sources are connected, you should adjust the gain levels. The best way to do that is to repeat the following steps for each input channel:
- If the input channel has a volume slider, put it to '0 db'
- From the audio source, play the loudest audio passage that channel is going to receive. Keep your mixer's master output lowered: you don't need to actually hear any sound now
- If the input channel has a LED signal level display, adjust the gain knob for the channel so that, when playing the loudest passage, the signal intensity for that channel is just below the "red LED zone".
- If the input channel has no LED display, turn off any speaker or amplifier connected to the mixer and raise the master volume to "0 db". Then, repeat the operation above looking at the master outputs LED instead of the signal input LEDs.